Gabby Jug: 1/48th Hasegawa P-47D Thunderbolt
- @PlaneThought41
- Oct 12, 2024
- 5 min read
The kit release in 1996 of the 1/48th Hasegawa P-47D Thunderbolt reset the bar for the best Thunderbolt on the market. Arriving was a well fitting P-47 type with finely scribed panel lines and good details. This kit would be the envy of P-47 builders... for a few years anyway.

Notable Kit Features:
Good fit of parts
Nicely detailed cockpit
Good wheel well and landing gear details
Two separate main wheel hubs styles included
Engine build up is nice with a back cylinder row half mould as well as a full row in front
Both early and paddle blade propellers provided (in my kit version)
8-Guns are moulded separately (not attached to the wings so you break them off during the build)
Separate wing pylons with anti-sway braces and bombs provided as an option
Flat-style belly fuel tank included
Two piece canopy glass is thin and clear

Build Inspiration:
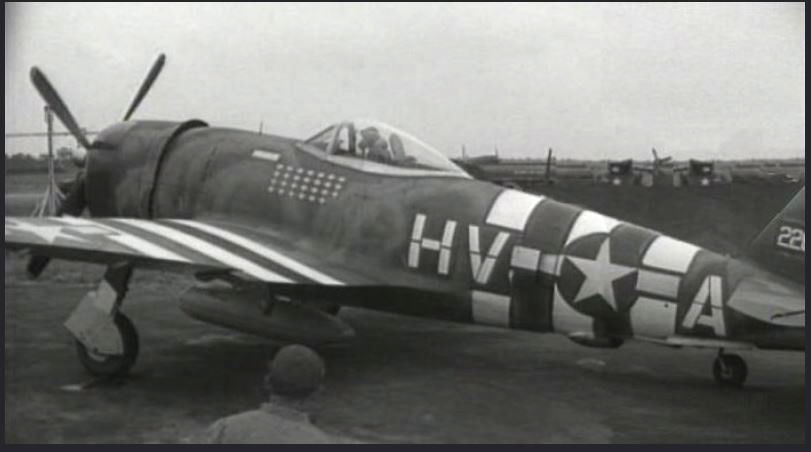
I wanted to have Gabby Gabreski's uniquely painted P-47 Thunderbolt in my collection for some time but hadn't gotten around to the build (somewhat due to the complexities of getting the paint job successfully completed). After coming across this nicely priced 2nd-hand kit at a hobby show, spending some time successfully gathering some good details regarding the aircraft, I decided it was about time to tackle this build. (As it turned out, the additional experience I had gained over the years would come in handy during this project.)

Heads-Up Report:
There have been complaints from model makers (shocking I know) that the Hasegawa P-47 isn't robust enough, as the belly is a bit shallow in this offering
All control surfaces are moulded in neutral (no separate flaps either)

Kit Additions / Modifications:
As it was included in the 2nd-hand kit, I used an aftermarket cockpit & engine detail set
Purchased Techmod's Zestaw Kalkomanii 48006 decals to depict Col. Francis Gabreski's P-47D-25RE as it appeared based out of Boxted, England in summer 1944
Purchased Master-Model set of eight P-47 .50 Browning M2 barrels to add some realism to the guns
(I thought it fitting that the decals and the guns were designed and produced in Poland for this particular build)

Finishing:
The kit build went pretty straight-forward, however the paint application on this aircraft could have been my undoing. I decided to paint the wing stripes and hopefully use the decals for the fuselage as they were white with a narrow black surround and that would prove to be complex to paint. I laid down the NMF underside to start things off and then after allowing that to dry for a day or so, masked the wing D-Day stripes. White was sprayed first followed by black on the underside of the wings, but not the uppers (which appear to have been left in camouflage). The underside and stripes were masked and then the RAF Dark Green was applied as the body base. After this green base dried, I moved on to try and replicate the Luftwaffe like RAF Ocean Gray over-spray. The finishing touch was added by painting the nose cowl red stripe as well as the red rudder. That set seemed to go fairly well or well enough to leave it alone at that. Everything got a gloss coat in preparation for the decal challenge. I tried to get the fuselage decal stripes and insignias to conform to the curves, however even after applying several heavy coats of decal solvent, I couldn't get them to lay down nicely. I soon called that effort a "No-Go" and started planning a reversal to paint the white fuselage D-Day stripes instead. First I would need to remove the applied decals. Due to the decal glue and softener agent used, the removal damaged the paint job enough to require a repaint along the rear fuselage. Back to NMF - Mask > White - Mask > Green > Gray and I managed a not too bad recovery. Let me tell you, if you think fuselage bands are tough to mask and tape try these ones that pause around the lettering and insignia. It is also at this point I examine my reference photo for the 100th time and notice, the red cowl stripe actually extends further back than I have it. Back to the paint shop for one more mask and spray fix. Thankfully patience paid off and a decent job was made of it.
Unfortunately, as I removed the masking tape the paint job takes additional damage with a number of the painted areas peeling off with the tape. The underside of the wings and fuselage were worst hit (Mental note forgotten: Paint doesn't adhere well over aluminium finishes) Ahhh! More repairs necessary. I remove the cowl masking and a large chunk of green and gray are removed with this as well... so much for that fix improving things! I re-patched these areas up as best I could (Paint chipping where you don't want it is challenging to repair.) Had this model been just any aircraft, I could have claimed "wear-n-tear" and left it as it was, but this was Gabreski's freshly painted aircraft that had a few well known glamour shots to go along with it, so it wasn't really an option.

My next challenge was how to recover the balance of the decaling since I had used and removed some of the markings including a good portion of the black surround stripes... I could just order another set of decals however that would take time and money... and besides I am pretty sure the decades old decal stash will have something to rescue me. (Fingers crossed.) Searches spares - finds narrow black stripes - game back on. I was able to cobble together the narrow surround stripes that frame the white D-Day stripes on the fuselage and about 3/4 of the way through, I look very carefully at those stripes and muse "are these black or dark blue?" Shotgun, I think they are actually navy blue... Now at this point, I am done jinking out mishaps on this kit and go "it is what it is, let's just finish it". Onto the matte clear coat. Lastly the delicate parts are secured and a call is place to The Hangar crew to get ready for a new arrival. The crew consensus was don't sweat the very dark navy stripes and numerous repairs, it's still looking pretty decent... and so it goes sometimes.

The After-Build Report:
The 1/48th Hasegawa P-47D Thunderbolt was arguably the nicest Jug out there until the release of the Tamiya versions in 2002 - 2003. I found the Hasegawa a straight-forward build with good detail, little hassle and minimal seam maintenance to boot. I ended up picking up a few of these Hasegawa kits at very good prices as P-47 fans thinned their Hasegawa stashes to build up the Tamiya ones, maybe? Either way I got a good build out of little investment and everybody's happy. The Tamiya P-47D kit is reportedly one of the best 1/48th models out there (and has a better shaped belly apparently) so there's a new king of type, if you want the best (but you don't have to toss the Hasegawa versions).
Feel free to comment or ask any questions - Keep on building, gain experience, challenge yourself if you like, but try not to stress yourself out over the build - it is supposed to be an enjoyable hobby after all - Cheers
Comments